In this tutorial, we will guide you through setting up the FxMagnetic Autotrader and address the common installation issues and troubleshooting methods. For this guide, we’ll use FxMagnetic Engulfing AutoTrader. The step-up steps apply to all the variations of the AutoTrader unless stated otherwise.
Pre-requisites
To configure the FxMagnetic Autotrader, ensure you have both MetaTrader 4 (MT4) and the FxMagnetic Engulfing indicator installed and operational on your desktop. Refer to our previous tutorials to go through the installation and optimization process.
Introduction
Autotrader enables traders to trade in an automated manner and seize market opportunities without continuous manual scanning. The Autotrader enables this by scanning for signals and promptly executing trades for traders, reducing manual intervention on each trade.
How to Download and Install FxMagnetic
Download the AutoTrader
Before starting, make sure you have downloaded the FxMagnetic AutoTrader file on your desktop.
-
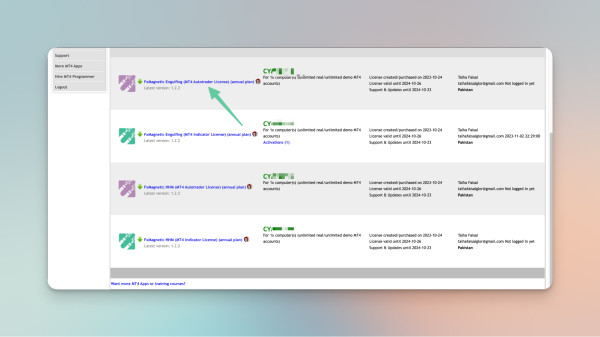
Log into your Download Center account and go to the downloads center.
-
Find the FxMagnetic Autotrader and click on it to begin downloading.
Once you’ve downloaded the Autotrader, there are two ways through which you can install it – Manual and Automatic (recommended).
Manual Installation
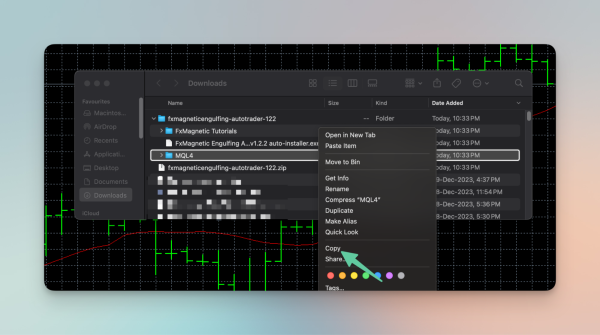
Begin the process by extracting the AutoTrader file. Once the file has been extracted:
-
Find the MQL4 folder in the extracted files and copy it.
-
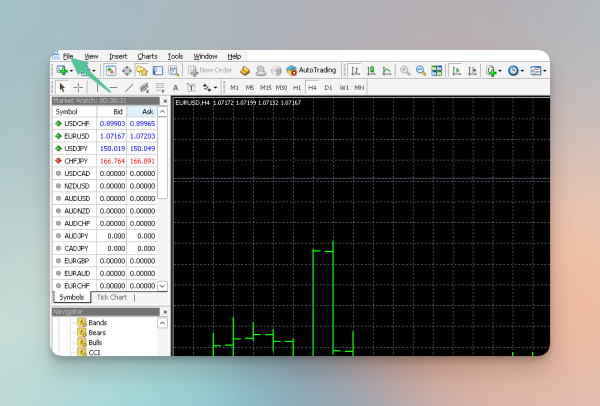
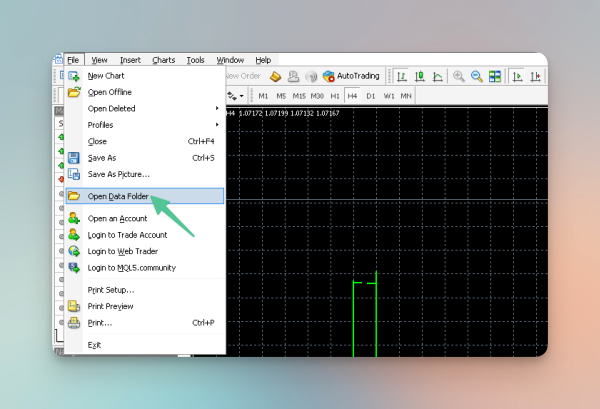
Open MetaTrader and click on File.
-
Then, click “Open Data Folder”
-
Paste the MQL4 folder in the Data Folder.
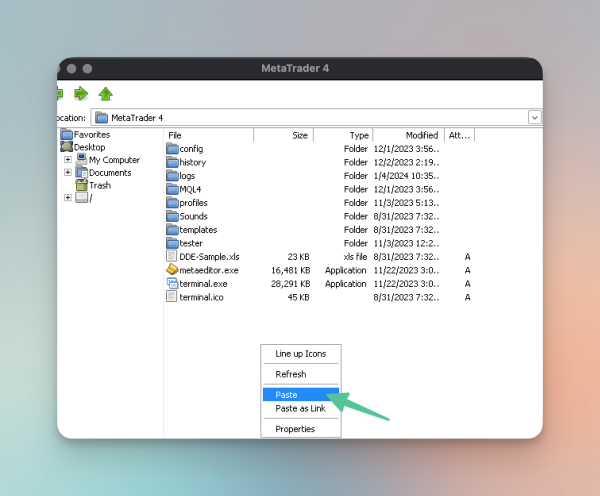
Note: If asked about replacing a DLL file, choose “Skip this file.”
Automatic Installation
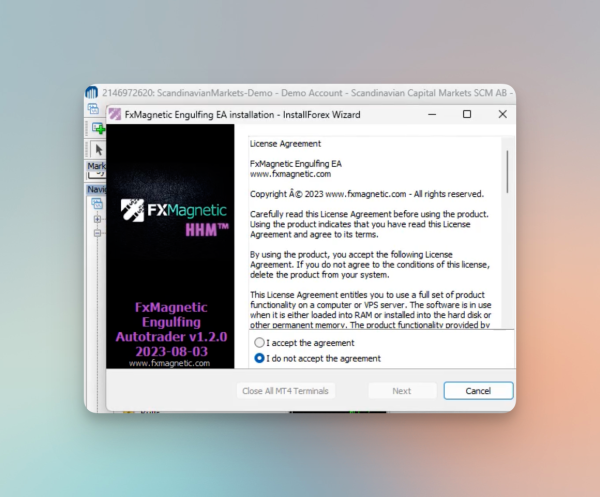
From the extracted files, double-click on the FxMagnetic Engulfing Autotrader launcher file. Click ‘Yes’ on any security prompts and agree to the terms by checking “I accept the agreement”. You can use the search bar to find your platform, like “Scandinavian Market” for MetaTrader 4.
Note: If there’s a conflict with a DLL file, you’ll see a prompt. Choose ‘No to All’ to avoid complications and finish the installation.
Verifying the Installation
After installing the Autotrader, verify that the installation was successful. There are two main methods to confirm this. Let’s go through each method in detail.
Method 1: Verify via MQL Folder
-
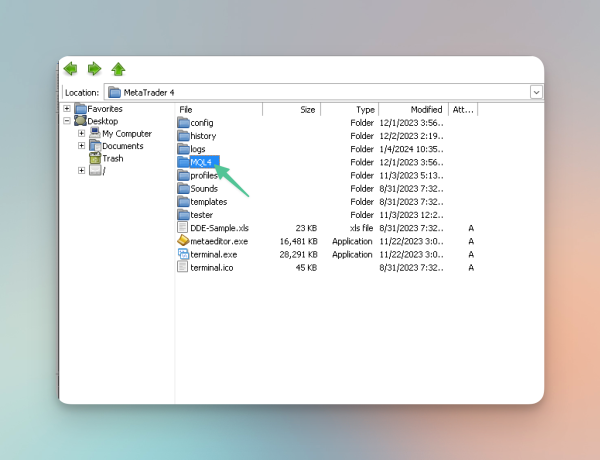
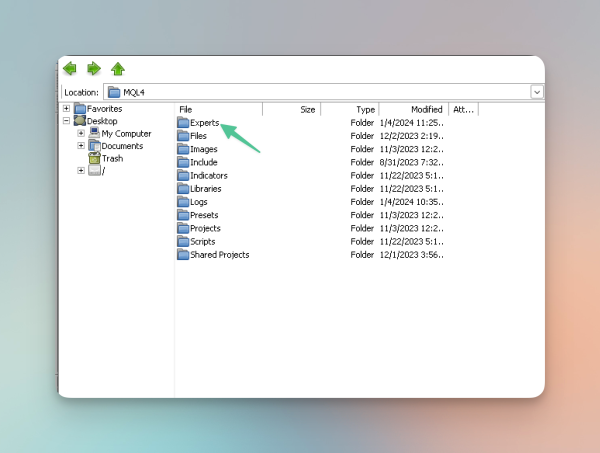
Inside MetaTrader, locate and open the MQL 4 folder.
-
In the MQL 4 folder, look for a sub-folder named Experts. Click on it to open.
-
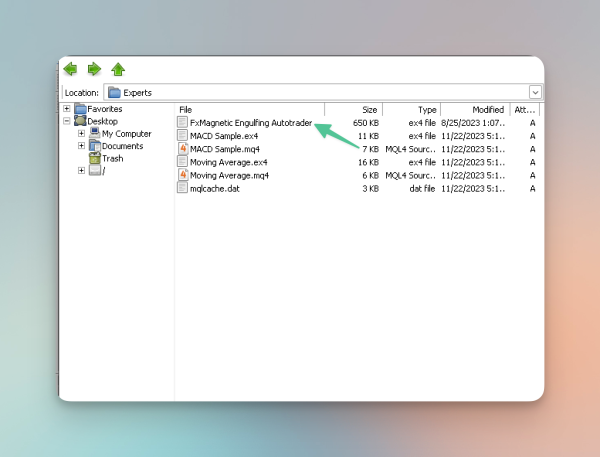
Inside Experts, search for the Autotrader file you installed. If you see the file here, it indicates that the installation was successful.
Method 2: Verify via Expert Advisors List
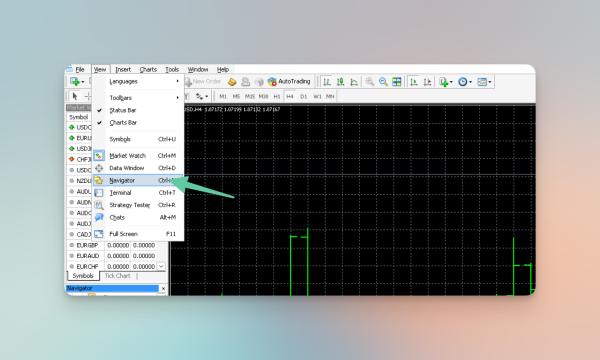
First, you need to access the navigator in MetaTrader. The navigator is a panel where you can see various MetaTrader options, including expert advisors. If the navigator is not immediately visible upon opening MetaTrader, you can find it by following the steps below:
-
Go to the top menu bar and click on View.

-
In the dropdown menu under View, you will see an option labeled Navigator. Click on this to open the navigator panel.
-
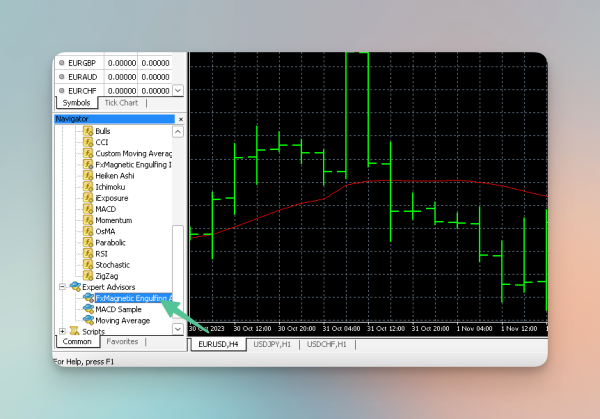
In the navigator, you’ll see a section named Expert Advisor. This is where MetaTrader lists all installed expert advisors, including Autotrader.
To make sure the list is up-to-date, refresh the list:
-
Right-click on the Expert Advisor section in the navigator. From the right-click menu, select Refresh. This action updates the list of expert advisors.
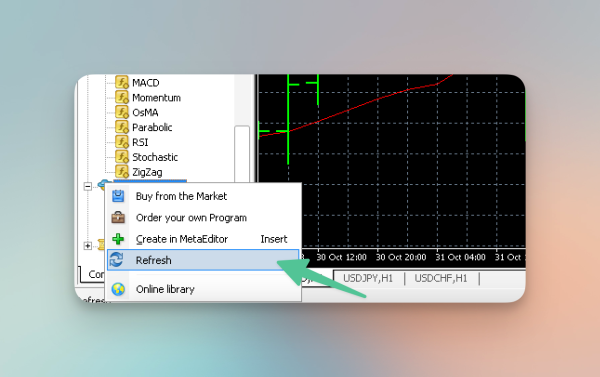
-
After refreshing the list, look through the list for the Autotrader. If Autotrader appears in this list, it confirms that the installation process was completed successfully. On rare occasions, newly installed indicator or Autotrader files might disappear (MT4 glitch). If this happens, just repeat the installation process.
How to Set Up FxMagnetic AutoTrader
This guide will help you set up the FxMagnetic AutoTrader on the MetaTrader platform. Follow these steps to ensure a correct setup.
Step 1: Check AutoTrader Box
First, make sure AutoTrading is enabled in MetaTrader.
-
Look for the AutoTrading box on your home screen.
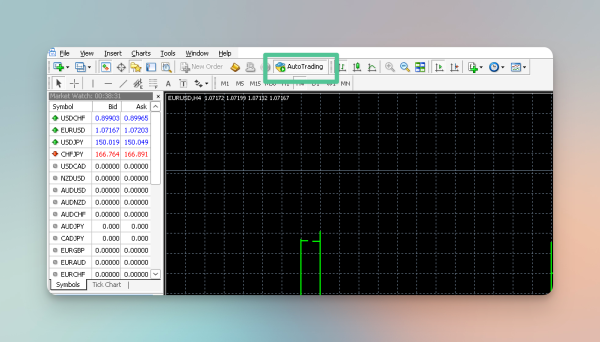
-
Click this box to activate AutoTrading. When active, it turns green; when deactivated, it’s red.
Step 2: Enable AutoTrader
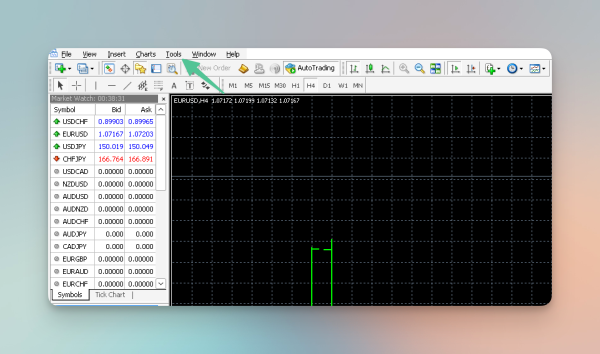
If you can’t see the AutoTrader box on your home screen:
-
Go to the Tools menu in MetaTrader.
-
Select Options.
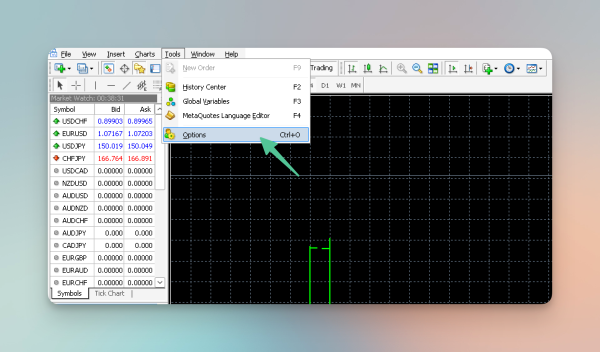
-
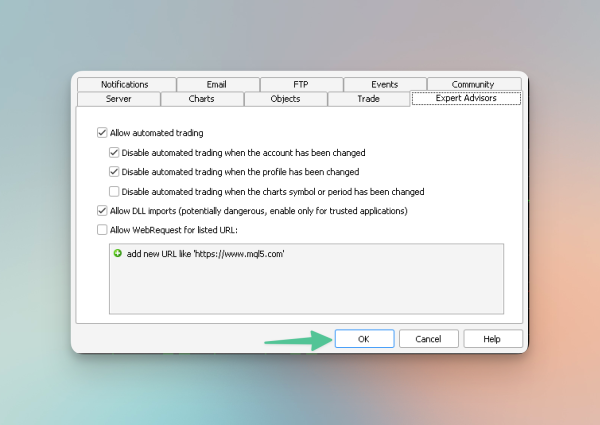
In the Options window, click on Expert Advisors and check the Allow Automated Trading box.
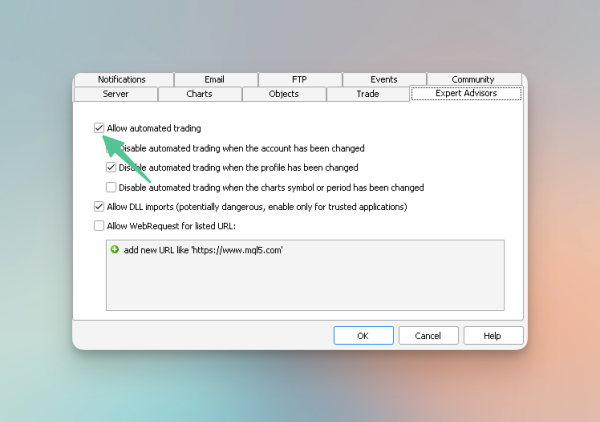
-
Also, check the Allow DLL Imports box to enable the use of external DLL files.

-
Click OK to save these changes.
Attaching AutoTrader to Your Chart
The next step is attaching the AutoTrader to your trading chart. This is a straightforward process. In your list of Expert Advisors, locate AutoTrader. You can add it to your chart either by double-clicking on it or by dragging and dropping it onto the desired chart.
How to Configure FxMagnetic AutoTrader
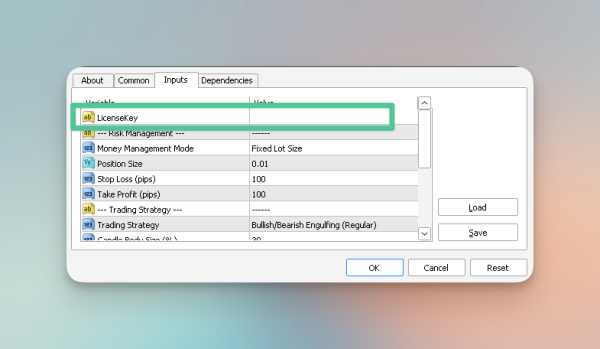
Upon attaching AutoTrader, a settings window will pop up. This window is your control panel to customize AutoTrader according to your trading style and risk preferences.
License Key: The first step in configuration is entering your license key. This key should be available in the Download Center.
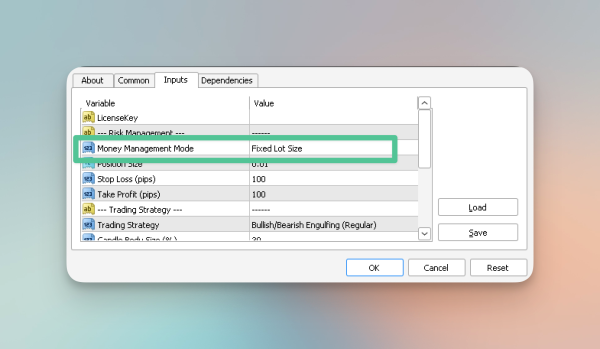
Money Management Mode: This crucial setting determines how AutoTrader handles the sizing of your trading positions. You have two options: a fixed lot size or a risk percentage per trade. By default, it’s set to a fixed lot size, meaning each trade will use a constant amount of lots. If you wish to change this, you can adjust the lot size to your preference. Alternatively, if you select the percentage option, the position size will represent a percentage of your trade capital.
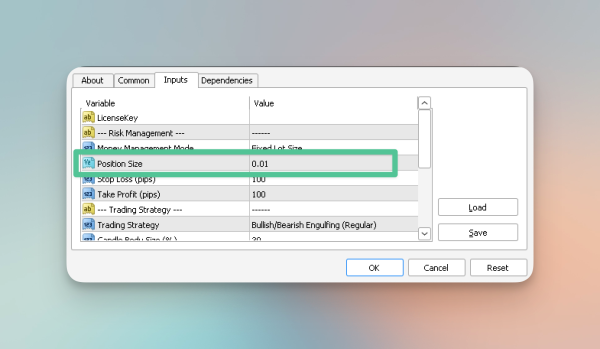
Position Size: Here, you define the size of your trading positions. You can choose between a fixed lot size or a percentage of your trading capital. In fixed lot size mode, the value remains constant for each trade. But if you’re using the percentage option, the position size will be a percentage of your trade’s value.
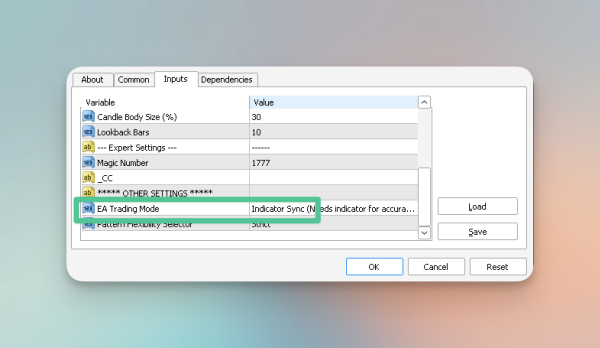
EA Trading Mode: This setting dictates how AutoTrader interacts with your trading environment. The default mode (Indicator Sync) requires a FxMagnetic indicator on the same chart for accurate trading, meaning AutoTrader will align with the indicator settings on your chart, such as stop loss, take profits, etc. In this mode, Autotrader ignores these settings inside Autotrader’s Inputs tab. There’s also an Independent Mode where AutoTrader operates without needing the indicator, but you’ll need to set each parameter manually.
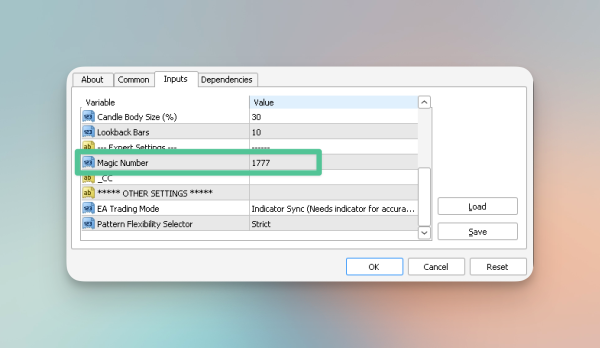
Magic Number: Lastly, assign a unique magic number for each instance of the EA you’re running. This number differentiates between AutoTrader instances across different trading charts on your MetaTrader platform. Each instance of the Autotrader on the same MetaTrader must have a unique Magic Number.
Common Issues while Configuring the Autotrader
These are the common issues faced by users while configuring Autotrader with their broker and their possible causes:
Issue: Autotrader doesn’t show up in MT4
Reason: If you’ve installed the autotrader but can’t find it in your MT4 platform, it might be because you haven’t refreshed the expert advisor list in the navigator window or restarted the platform after installation.
Issue: Autotrader is installed but not trading
Reason: If the Autotrader is installed but not actively trading, it could be due to various reasons like incorrect settings, the auto trading option not being turned on, or the EA not being connected to the chart.
Issue: Not compatible
Reason: Additionally, compatibility issues may arise in some cases where the autotrader isn’t compatible with the broker you’re using. If your broker doesn’t permit auto trading, the FxMagnetic Engulfing Autotrader will not function.
Additional Notes
Below are some of the things to keep in mind when working with AutoTrader.
-
If you haven’t attached the FxMagnetic indicator to the chart while the Autotrader is set to operate in its default mode (Indicator Sync), the EA will not function.
-
Auto trading will be paused during optimization.
-
In the Indicator Sync mode, the trader must only set money management mode, position size, and magic number.
-
With EA being attached to the chart, every signal that the indicator sends Autotrader will immediately take that trade and close it when it’s time to close it.
-
If you make changes to the settings while both the indicator and EA are running, the EA may respond to those changes and could potentially close the trade if it has an open position.
Wrapping Up
This guide helps traders set up the Autotrader to enhance their way of trading in the dynamic financial markets. With auto trading, trades can be executed based on predefined strategies with round-the-clock monitoring and reduced manual workload.
Next Chapter: Troubleshooting Most Common FxMagnetic Indicator Issues