
Various Trading Styles with FxMagnetic Flow Trader
In this tutorial, we will explore the four core trading strategies available in FxMagnetic Flow Trader: Dual MA Crossover, MOMO Strategy, Price MA Crossover, and Moving Average Pullback. Each strategy comes with multiple variations and pattern flexibility modes which can help you take advantage of different market conditions and get better trading results in the process.
This guide will jumpstart your progress with FxMagnetic Flow Trader so you can start utilizing its capabilities effectively.
Built-In Trading Strategies Quick Look

- Dual MA Crossover
- Modes: Regular, Reverse, Buy Only, Sell Only, Reverse Buy Only, Reverse Sell Only
- MOMO Strategy (by Kathleen)
- Modes: Regular, Reverse, Buy Only, Sell Only, Reverse Buy Only, Reverse Sell Only
- Price MA Crossover
- Modes: Regular, Reverse, Buy Only, Sell Only, Reverse Buy Only, Reverse Sell Only
- Pattern Flexibility: Strict or Flexible modes
- Moving Average Pullback
- Modes: Regular, Reverse, Buy Only, Sell Only, Reverse Buy Only, Reverse Sell Only
- Pattern Flexibility: Strict or Flexible modes
More details on each strategy below…
What Is The Flow Trader System
The Flow Trader system consists of two main components that work together:
Scanner Application
The Scanner serves as the analytical engine, allowing you to:
- Build and test trading strategies
- Run backtest optimizations
- Generate trading signals based on your configured parameters
- Analyze strategy performance with detailed metrics
Auto Trader Application
The Auto Trader works in conjunction with the Scanner to:
- Automatically execute signals generated by the Scanner
- Provide hands-free trading once your strategy is configured
- Maintain consistent execution without emotional interference
Important: You can use the Scanner independently for manual signal following, or combine both applications for full automation.
General Strategy Notes
Before diving into individual strategies, understand these key points:
Moving Average Type
All Flow Trader strategies use Exponential Moving Averages (EMAs), even though they may be referred to simply as “moving averages” throughout the interface.
Pattern Flexibility Modes
- Price MA Crossover and MA Pullback strategies support two pattern flexibility modes: Strict and Flexible. More on this later.
- Dual MA Crossover and MOMO Strategy always operate in Strict mode only
Strategy Building Blocks
The built-in strategies serve as foundation building blocks that can be enhanced with:
- Trade filters for additional confirmation
- Time filters for specific trading sessions
- Various exit conditions
- Different parameter combinations through optimization
This creates virtually endless possibilities for strategy development.
Trading Modes
Each strategy can be executed in different modes to adapt to various market conditions:
Regular Mode
- Takes both buy and sell trades
- Closes existing trades when opposite signal appears
- Only one trade opens at a time
Reverse Mode
- Takes opposite trades from what the strategy indicates
- Example: Take sell trade when strategy shows buy signal
Buy Only Mode
- Only takes buy trades
- Holds until stop loss or take profit
- Ignores sell signals
Sell Only Mode
- Only takes sell trades
- Holds until stop loss or take profit
- Ignores buy signals
Reverse Buy Only Mode
- Only looks for buy signals but takes sell trades instead
Reverse Sell Only Mode
- Only looks for sell signals but takes buy trades instead
Exit Behavior
- Buy Only/Sell Only modes: Trades exit only at stop loss or take profit
- Regular/Reverse modes: Trades may exit earlier due to opposite signals
Strategy Deep Dive
1. Dual MA Crossover Strategy
The most fundamental moving average strategy that creates famous Golden Cross and Dead Cross setups used by institutional traders.

How It Works:
- Uses two EMAs: Fast MA and Slow MA
- Entry occurs when Fast MA crosses Slow MA
- Direction depends on crossover direction and selected mode
Key Parameters:
- Parameter 1 (Fast MA Period): Controls the faster moving average
- Parameter 2 (Slow MA Period): Controls the slower moving average
Entry Logic:
- Buy Signal: Fast MA crosses above Slow MA (in Regular mode)
- Sell Signal: Fast MA crosses below Slow MA (in Regular mode)
- Reverse Mode: Opposite signals are taken
Strategy Benefits:
- Simple and reliable trend-following approach
- Works well with proper trade filters
- Can create profitable Golden Cross (50/200) and Dead Cross strategies
- Optimization can discover much better period combinations than traditional settings
2. MOMO Strategy (by Kathy Lien)
")
This strategy was created and popularized by Kathleen trader, combining price and momentum confirmation for high-quality signals.
How It Works:
- Price must cross a moving average
- MACD must confirm momentum within specified bars
- Both conditions must align for valid entry
Key Parameters:
- Parameter 1 (Fast MA Period): Controls both the price crossover MA and MACD Fast MA
- Parameter 2 (Slow MA Period): Controls MACD Slow MA only
Entry Logic:
- Buy Signal: Price crosses above EMA AND MACD crosses zero line (positive to negative or vice versa) within set timeframe
- Sell Signal: Price crosses below EMA AND MACD confirms with zero line crossover
- MACD confirmation must occur within a specified number of bars after price crossover
Confirmation Requirements:
- MACD must cross the zero line to confirm momentum
- This crossover must happen within the allowed bars after price crosses the EMA
- If MACD doesn’t confirm within the timeframe, the signal is invalid
Strategy Benefits:
- Reduces false signals through dual confirmation
- Momentum filter helps identify stronger moves
- Popular strategy with documented success
3. Price MA Crossover Strategy
A refined approach to price and moving average crossovers that includes noise reduction mechanisms.
How It Works:
- Price crosses a single moving average
- Includes “clean space” requirements to avoid false signals
- Supports both Strict and Flexible pattern flexibility modes
Key Parameters:
- Parameter 1 (MA Period): Sets the moving average period for crossovers
- Parameter 2 (No Touch Bars): Defines required clean space before valid crossover
Entry Logic:
- Buy Signal: Price crosses above EMA after required clean space
- Sell Signal: Price crosses below EMA after required clean space
- Clean space prevents entries during choppy, sideways markets
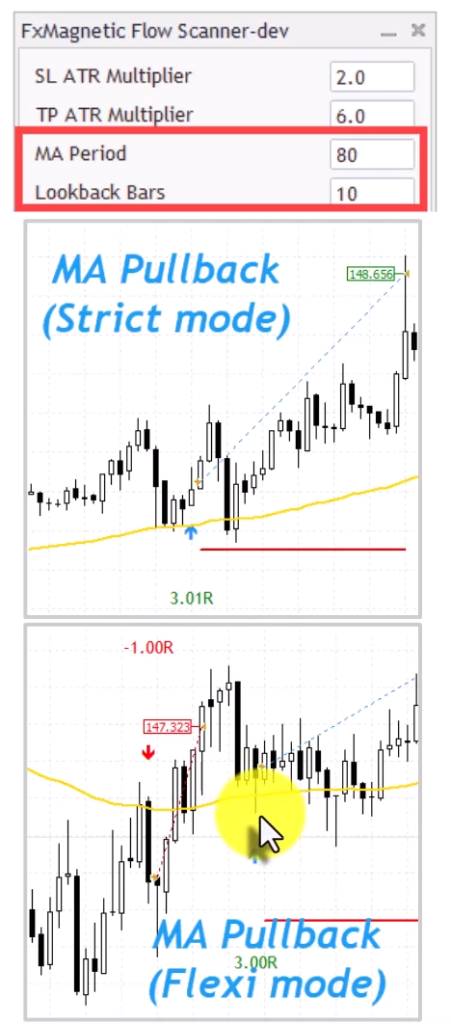
4. Moving Average Pullback Strategy
A sophisticated pullback strategy that can create Linda Rashke’s famous “Holy Grail” setup when combined with ADX.

How It Works:
- Price establishes trend direction relative to moving average
- Waits for pullback to touch the moving average
- Enters when price resumes in trend direction
- Includes trend strength confirmation through lookback bars
Key Parameters:
- Parameter 1 (MA Period): Sets the moving average period
- Parameter 2 (Look Back Bars): Defines trend confirmation period
Entry Logic:
- Price must pull back to EMA and touch it
- At least 80% of lookback bars must close on same side of EMA (trend confirmation)
- Price must resume in main trend direction after pullback
Trend Confirmation:
- For buy signals: 80% of lookback bars must close above EMA
- For sell signals: 80% of lookback bars must close below EMA
- If fewer than 80% meet criteria, signal is disqualified
Linda Rashke Setup: When combined with ADX trade filter (ADX > 20), this strategy replicates the famous Holy Grail setup popularized by Linda Rashke.
Strategy Benefits:
- Excellent risk-reward ratios
- Natural stop loss placement at pullback low/high
- Works well in trending markets
- Can be enhanced with various trade filters
Pattern Flexibility Selector Feature
The Pattern Flexibility Selector is available for Price MA Crossover and MA Pullback strategies, controlling how strictly the pattern requirements are enforced.

Strict Mode (S)
- More conservative pattern recognition
- Stricter requirements for signal validation
- Generally produces fewer but potentially more reliable signals
- Default setting recommended for beginners
- Shows “S” next to strategy name on chart
Flexible Mode (F)
- More permissive pattern recognition
- Relaxed requirements for signal validation
- Generates more frequent signals
- May require additional optimization when enabled
- Shows “F” next to strategy name on chart
Impact on Results
Switching between modes can significantly change:
- Number of generated signals
- Trade sequence and timing
- Overall strategy performance
- Risk-reward characteristics
Always test both modes during optimization to determine which works better for your specific pair and timeframe.
Important Trading Rules
- Single Trade Management: Software opens one trade at a time per strategy for better risk management. For multiple concurrent trades, attach software to additional charts.
- Exit Behavior:
- Regular/Reverse modes: New opposite signals close existing trades
- “Only” modes: Trades run until stop loss or take profit
- Filter Integration: Use trade filters for additional confirmation and improved results.
- Mode Experimentation: Consider testing different modes (Regular, Reverse, Buy Only, Sell Only) as market conditions change.
- Parameter Optimization: Regularly re-optimize parameters to adapt to changing market conditions.
Monitoring Performance
Track these key metrics for each strategy:
- Win Rate Percentage: Target varies by strategy type and risk-reward ratio
- Maximum Consecutive Losses: Monitor for strategy viability
- Return to Drawdown Ratio: Higher ratios indicate more efficient strategies
- Total Pips/Points Gained: Absolute performance measure
- Drawdown Percentage: Risk measurement and capital preservation
- Trade Frequency: Ensure adequate signal generation
Tips for Success
- Don’t Underestimate Simple Strategies. Even basic Dual MA Crossover can be highly profitable with proper optimization and trade filters.
- Test All Pattern Flexibility Modes. When available, test both Strict and Flexible modes as results can vary significantly.
- Combine with Trade Filters. Enhance base strategies with appropriate trade filters for better signal quality.
- Optimize for Each Market. Run separate optimizations for different currency pairs and timeframes.
- Consider Reverse Modes. Sometimes the opposite of what seems logical works better in specific market conditions.
- Use Higher Timeframe Filters. Incorporate higher timeframe analysis for trend confirmation.
- Start with Proven Setups. Begin with well-known combinations like Golden Cross or Holy Grail, then optimize parameters.
- Document Successful Configurations. Keep detailed records of profitable parameter combinations.
- Regular Reoptimization. Markets change, so periodically re-optimize your strategies to maintain effectiveness.
- Focus on Risk Management. Even the best strategy requires proper position sizing and risk management to be profitable long-term.